EMD-API - Climate Data Access: Difference between revisions
| Line 18: | Line 18: | ||
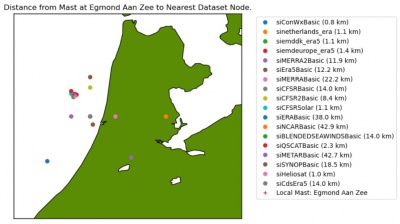
[[Image:EgmondAanZee.jpg|thumb|400px|right|Data nodes near the Egmond Aan Zee Offhore ]]The simplest way to use the EMDAPI with python is to install the client software in a virtual environment. If you are using CONDA or [https://docs.conda.io/en/latest/miniconda.html MINICONDA], we recommend that you create a new virtual environment and use a recent 3.x version of python. When the virtual environment is created, then activate the environment. | [[Image:EgmondAanZee.jpg|thumb|400px|right|Data nodes near the Egmond Aan Zee Offhore ]]The simplest way to use the EMDAPI with python is to install the client software in a virtual environment. If you are using CONDA or [https://docs.conda.io/en/latest/miniconda.html MINICONDA], we recommend that you create a new virtual environment and use a recent 3.x version of python. When the virtual environment is created, then activate the environment. | ||
''Open your Anaconda | ''Open your Anaconda Prompt. Copy-paste the following lines:'' | ||
<pre> | <pre> | ||
conda create -n emdapi python=3.8.5 | conda create -n emdapi python=3.8.5 | ||
Revision as of 12:39, 10 September 2020
Origin and Purpose

EMDAPI is a software library from EMD International. It delivers a unified interface to a wide range of climate data. EMDAPI helps consultants, analysts and scientists working with high-resolution climate data in achieving their goals in an efficient way. It has the following key-features:
- Instant data delivery: All datasets within the EMDAPI are ready processed and requests are served within seconds or minutes
- 40+ climate datasets: EMDAPI provides access more than 40 of the best local, regional and global climate datasets and allows access to more than 1Pb of data.
- Unified interface: The unified interface which allows for integration to internal processes and tools - and also very efficient uncertainty analysis with gigabytes of data easily accessed.
- Trusted datasets: EMDAPI builds upon the trusted data-bases and data-sources that have been used through the online-data services in windPRO for more than a decade.
- Built on open standards: EMDAPI is a REST based service that implements the OpenAPI standard].
- Available from any development tool: Access to the climate databases is available from your preferred development platform - C#, R, python, html, java, php, scala and swift. Just use the OpenAPI tools to generate the client software for your preferred platform.
Access
The API is currently (September 2020) in beta-release.
To see more documentation and to access the data-services, please visit the API through the following URL:
Python - Installation and Test

The simplest way to use the EMDAPI with python is to install the client software in a virtual environment. If you are using CONDA or MINICONDA, we recommend that you create a new virtual environment and use a recent 3.x version of python. When the virtual environment is created, then activate the environment.
Open your Anaconda Prompt. Copy-paste the following lines:
conda create -n emdapi python=3.8.5
conda activate emdapi
Install the required packages needed in order to do data-science and use the examples provided within the jupyter notebooks. We have have validated this setup using specific package versions (used in the commands below).
In the Anaconda Prompt, copy-paste the following lines, one by one:
conda install -c conda-forge pandas=1.1.0 numpy=1.19.1
conda install -c conda-forge matplotlib=3.3.1 basemap=1.2.2 basemap-data-hires=1.2.2
conda install -c conda-forge jupyter=1.0.0 ipykernel=5.3.4
Download the zipped-file holding the OpenAPI python client.
Unpack the file and install it within your virtual environment:
In the Anaconda Prompt: Move to the folder, where you have unpacked the zipped file. Copy-paste the following line:
python setup.py install
Make sure that the new emdapi virtual enviroment (python-kernel) is available to be used with jupyter-notebook environment:
python -m ipykernel install --user --name=emdapi
In order to test your setup and learn to use the EMDAPI, we suggest that you download the jupyter-notebook examples that we have created - here.
Unpack the zip files and run the command below in your terminal or command-shell.
If jupyter prompts for you to select another python-kernel, then select the emdapi kernel (may also be selected directly from the 'Kernel' drop-down menu).
In the Anaconda Prompt: Move to the folder, where you have saved the jupyter-notebook examples. Copy paste the following line to open jupyter notebook from where you can open the examples.
jupyter notebook
Within the internet-browser (and jupyter user-interface), run select the notebook file (*.ipynb).
Then work your way through through each example provided.
Client Software Other Languages and Tools
A list of client software generated from the swagger editor is found below.
If you want to generate the client libries yourself - or use other tool than mentioned above - one possible process is to: