Performing Regression Test of windPRO: Difference between revisions
| Line 78: | Line 78: | ||
[[File:windPRO_Calculation_Tester_after_first_run.JPG|600px]] | [[File:windPRO_Calculation_Tester_after_first_run.JPG|600px]] | ||
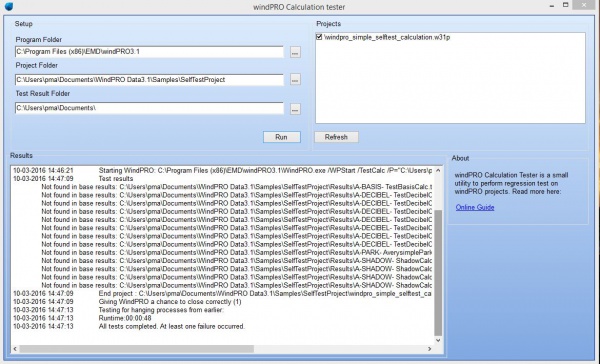
After windPRO have closed down the Calculation tester will look for a "Base" folder and compare to the "Results" folder, file by file. On this first run the Base folder | After windPRO have closed down the Calculation tester will look for a "Base" folder and compare to the "Results" folder, file by file. On this first run the Base folder will not exist and all you will see is messages like "Not found in base results: XXXXX". | ||
Manually inspect the files in the "Results" folder. The content is roughly identical to selected Result-to-file exports from a normal windPRO session. | Manually inspect the files in the "Results" folder. The content is roughly identical to selected Result-to-file exports from a normal windPRO session. | ||
Revision as of 13:53, 13 April 2016
Introduction
What is Regression Testing?
'Regression testing is a type of software testing that seeks to uncover new software bugs, or regressions, in existing functional and non-functional areas of a system after changes such as enhancements, patches or configuration changes, have been made to them.'
(Source: http://en.wikipedia.org/wiki/Regression_testing)
Regression Testing is done all the time by the windPRO software development team. Whenever some feature has been added or changes, it has to be ensured that these changes do not influence the rest of windPRO in any negative way. Performing this kind of testing manually can be quite an extensive job. Over the years a number of procedures and tools have been designed to help the process. The purpose of this document is to describe how windPRO end-users can benefit from one of these tools.
Target audience:
This guide is aimed at people with extensive knowledge about both windPRO and general Windows OS setup.
Regression Testing as a tool for end-users
The windPRO Calculation Tester is a small tool delivered together with a standard windPRO installation. It allows anybody to design a windPRO project and use this project to perform regression testing of windPRO
The basic flow consists of four steps:
- Step I: Design a simplified project with some data and calculations typical for your normal work-flow
- Step II: Run the project through the calculation tool and save the results for future reference
- Step III: Whenever required re-run the calculations and compare the results to the saved ones
- Step IV: Evaluate any changes in the results.
- What is causing the change (windPRO or external setup)?
- Is the change a software bug or an improvement?
This can be beneficial on several occasions:
- After installing windPRO upgrades (New version or Service Pack)
- After changing the setup of the windPRO environment
- New PC / OS
- Installing Windows Updates
- Updating firewall / antivirus
- Rearranging the organization of windPRO data
Guide
Step I - Designing a project
The creation of the project is done using standard windPRO. Any windPRO project should in principle be usable for a regression test, but for efficiency here is a few guidelines:
- Setup the most simple possible project that captures the calculation setup you want to test
- Limit the amount data in order to have quick calculations and hence quick feedback
- Create new dedicated projects for regression test and keep all data used in the project folder (and sub-folders)
- Avoid references to any data on network drives and any data used in other projects
- Remember that windPRO is the subject of the test. The project in itself might not be very interesting
Step II - The first run
Ensure that any normal windPRO sessions have been closed and that all project data have been saved.
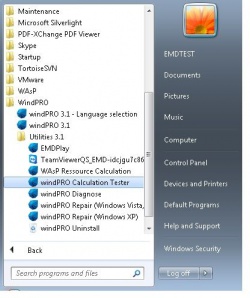
Start the Calculation Tester:
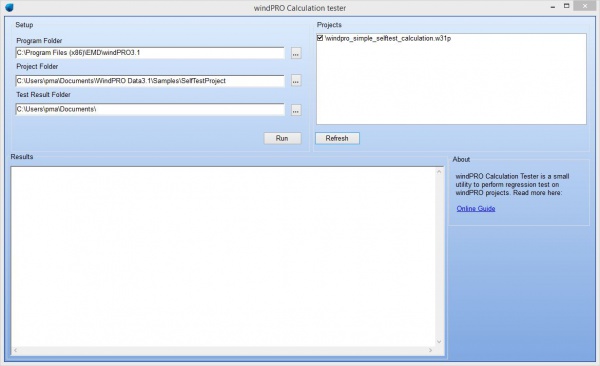
The Calculation Tester is a simple one-window program:
It contains a simple setup section:
Program Folder: The path to the installed windPRO version. Typical C:\Program Files (x86)\EMD\windPRO3.1
Project Folder: The path to the project(s) to be used. Any folder can be used. If your select a folder containing several projects, it is possible to control which projects are used in the section Projects on the right. For simplicity the rest of this guide will assume that only one project have been selected.
Test Result Folder: The path where the Calculation Tester should save log files regarding test results.
After checking the setup section and ensuring the correct project have been selected, click "Run".
You will now see windPRO startup and load the selected project. One by one each calculation inside the project will be re-calculated and selected results will be written to a text-file inside a "results" folder.
After all calculations have been completed windPRO will close down again. You will see some status messages in the results section.
After windPRO have closed down the Calculation tester will look for a "Base" folder and compare to the "Results" folder, file by file. On this first run the Base folder will not exist and all you will see is messages like "Not found in base results: XXXXX".
Manually inspect the files in the "Results" folder. The content is roughly identical to selected Result-to-file exports from a normal windPRO session.
Rename the folder "Results" to "Base". Now these results will be considered as the correct results.
Step III - Rerunning the calculation
[Coming soon :-)]
Step IV - Evaluating any changes
[Coming soon :-)]


